Clojure in Docker 101
Last updated:
January 28, 2026
5 min read
Clojure

Oleksandr Druk
Clojure Developer

Sofiia Yurkevska
Content Writer
.avif)
Contents
See more
You know Docker, everybody knows Docker. According to the 2024 Stack Overflow Survey, 59% of devs use Docker, making it the most popular tool in the stack. So yeah, it's a big deal.
Now, let's address the elephant in the room: Docker and Clojure aren't always best pals. Clojure's long startup times and the JVM's memory hunger can make for some chunky containers. Plus, REPL in a containerized environment – it's not exactly a walk in the park.
If you're new to Clojure development and want to containerize your app, you're in the right place. We tried our best to cut through the fluff and get you up and running. Before we jump in, make sure you've got Docker and Leiningen installed. If not, grab those real quick.
Docker and Clojure have friction points—long JVM startup times, memory usage, and REPL in containers is tricky.
Basic Setup: Start with a Dockerfile using the Clojure base image, copy your project, run lein deps and lein uberjar, then execute the JAR.
Optimization: Use multi-stage builds to dramatically reduce image size by building with clojure:lein but running with openjdk:11-jre-slim.
Database Integration: Add Docker Compose to orchestrate your app with PostgreSQL or other services.
Dev vs Prod: Maintain separate configurations—dev exposes REPL on port 7888 with volume mounts for live coding, while prod uses an optimized multi-stage build containing only the uberjar.
Result: Clean local environments, lean production containers, and REPL access during development.
Basic Docker setup for deploying Clojure projects
Create project
Let's create a simple project for demonstration purposes. Here comes the Leiningen you installed earlier.
lein new app clojure-docker-demoTo keep it simple, we’ll make the application print "Hello, Docker!" when run.
(ns clojure-docker-demo.core
  (:gen-class))

(defn -main
  [& _args]
  (println "Hello, Docker!"))
Create Dockerfile
Now that our Clojure project is up and running, it's time to containerize it. Let's create a Dockerfile to wrap our app in Docker goodness.
Next, we'll create a <span style="font-family: courier new">Dockerfile</span> (no extension) in the root of your project and drop this in:
# Use the official Clojure image with Lein pre-installed as the base image
FROM clojure:lein

# Create and set the working directory
RUN mkdir -p /usr/src/app
WORKDIR /usr/src/app

# Copy the project files into the Docker image
COPY . .

# Resolve dependencies
RUN lein deps

# Build the application
RUN lein uberjar

# Set the command to run the application
CMD ["java", "-jar", "target/uberjar/clojure-docker-demo-0.1.0-SNAPSHOT-standalone.jar"]
Let's break this down:


This Dockerfile works, but it's not winning any efficiency awards. We'll optimize it later with multi-stage builds. For now, let's keep it simple. Next up, we'll build this Docker image and take it for a spin!


Building the Docker Image
Now that we have our Dockerfile ready let's build the Docker image:
docker build -t clojure-docker-demo .What's happening here?
.avif)
Running the Docker Container
With the image built, you can now run your Clojure application in a Docker container:
# --rm flag tells Docker to remove the container after it stops
docker run --rm clojure-docker-demo
If all goes well, you should see our "Hello, Docker!" message pop up.

Extending Docker setup
While our current setup provides a solid foundation, real-world applications often require more advanced techniques to optimize builds, integrate with databases, and manage multiple services.
Multi-stage builds
Remember how we mentioned Clojure apps can be chunky? By separating the build and runtime environments, multi-stage builds help us slim things down. This is useful for Clojure applications, where you might need to compile your application with Leiningen but only require a JVM to run the compiled JAR file in production. Here's how it goes:
Let's revamp our Dockerfile:
# Stage 1: Build the Clojure application
FROM clojure:lein AS builder

WORKDIR /usr/src/app
COPY . .
RUN lein uberjar

# Stage 2: Run the application in a lightweight environment
FROM openjdk:11-jre-slim

WORKDIR /usr/src/app
COPY --from=builder /usr/src/app/target/uberjar/clojure-docker-demo-0.1.0-SNAPSHOT-standalone.jar .

CMD ["java", "-jar", "clojure-docker-demo-0.1.0-SNAPSHOT-standalone.jar"]
What's new?
Integrating with database
Have you seen an app without a database in the wild? We haven't. So, let’s integrate a Clojure application with one inside a Docker container. We’ll use PostgreSQL as an example.
First, we must add the necessary dependencies to <span style="font-family: courier new">project.clj</span>. For example, to connect to PostgreSQL:
:dependencies [[org.clojure/clojure "1.11.1"]
               [org.postgresql/postgresql "42.7.3"]
               [org.clojure/java.jdbc "0.7.12"]]
Let's update core.clj to interact with the PostgreSQL database:
(ns clojure-docker-demo.core
(:gen-class)
(:require [clojure.java.jdbc :as jdbc]))
(def db-spec {:dbtype "postgresql"
:dbname "mydb"
:host "db"
:user "postgres"
:password "password"})
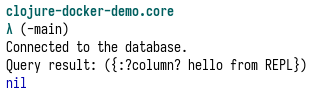
(defn -main
[& _args]
(jdbc/with-db-connection [conn db-spec]
(println "Connected to the database.")
(let [result (jdbc/query conn ["SELECT 'hello from db'"])]
(println "Query result:" result))))
We connect to a PostgreSQL database running in a Docker container. The host is set to db, and the database service's name is defined in our Docker Compose file.
Orchestrating multiple services with Docker Compose
First, we need to create a <span style="font-family: courier new">docker-compose.yml</span> file at the root of our project:
version: '3.9'
services:
  db:
    image: postgres
    # Set shared memory limit when using docker-compose
    shm_size: 128mb
    environment:
      POSTGRES_DB: mydb
      POSTGRES_USER: postgres
      POSTGRES_PASSWORD: password
    ports:
      - "5432:5432"

  app:
    build: .
    ports:
      - "8080:8080"
    depends_on:
      - db
Here, the <span style="font-family: courier new">db</span> part defines the PostgreSQL service, setting necessary environment variables for the database and mapping the database port inside the container to the host. The </SPAN> part defines our Clojure application service and states the dependency on the <span style="font-family: courier new">db</span> service to the <span style="font-family: courier new">app</span> service waiting for the <span style="font-family: courier new">db</span> to be ready.
Now, we can start both the application and the database using <span style="font-family: courier new">docker-compose</span>:
docker-compose upDocker Compose will automatically build the image for your Clojure application, start the PostgreSQL database, and link the two services together.

Next, we'll talk about separating your development and production setups because, let's face it, what works in dev doesn't always fly in prod.
Separate Development & Production setup
But what if you want to also have a development setup with access to REPL? Docker allows you to set up development and production environments while tailoring each to its specific needs. We can create separate Dockerfiles and different Docker Compose configurations to define the specifics for development and production.
Development setup
For development, we want fast iteration (no rebuilding images for every code change), REPL access (because who doesn't love a good REPL?), and all the debugging tools we can get our greedy hands on.
Firstly, we'll create a <span style="font-family: courier new">Dockerfile.dev</span> that adds the REPL support.
FROM clojure:lein AS dev

RUN mkdir -p /usr/src/app
WORKDIR /usr/src/app
COPY . .
RUN lein deps

# Expose the REPL port
EXPOSE 7888

# Command to start the REPL
CMD ["lein", "repl", ":headless", ":host", "0.0.0.0", ":port", "7888"]
And a <span style="font-family: courier new">docker-compose.dev.yml</span> that will use it and map our REPL port.
version: '3.9'
services:
  db:
    image: postgres
    # Set shared memory limit when using docker-compose
    shm_size: 128mb
    environment:
      POSTGRES_DB: mydb
      POSTGRES_USER: postgres
      POSTGRES_PASSWORD: password
    ports:
      - "5432:5432"

  app:
    build:
      context: .
      dockerfile: Dockerfile.dev
    ports:
      - "7888:7888"  # REPL port
    depends_on:
      - db
Production setup
We want a slim, efficient image for production. There should be no development tools or source code, and only what's necessary to run the application.
Similarly, create a <span style="font-family: courier new">Dockerfile.prod</span> optimized for production, running only the <span style="font-family: courier new">uberjar</span>.
FROM clojure:lein AS builder
WORKDIR /usr/src/app
COPY . .
RUN lein uberjar

FROM openjdk:11-jre-slim
WORKDIR /usr/src/app
COPY --from=builder /usr/src/app/target/uberjar/clojure-docker-demo-0.1.0-SNAPSHOT-standalone.jar .

CMD ["java", "-jar", "clojure-docker-demo-0.1.0-SNAPSHOT-standalone.jar"]
#+end_src

And also docker-compose.prod.yml:
#+begin_src yaml
version: '3.9'
services:
  db:
    image: postgres:13
    # Set shared memory limit when using docker-compose
    shm_size: 128mb
    environment:
      POSTGRES_DB: mydb
      POSTGRES_USER: postgres
      POSTGRES_PASSWORD: password
    ports:
      - "5432:5432"

  app:
    build:
      context: .
      dockerfile: Dockerfile.prod
    ports:
      - "8080:8080"
    depends_on:
      - db
You can leverage the overriding mechanism provided by docker-compose to avoid maintaining two separate Docker Compose files. Learn more here.
Running the setup
To use the development setup with REPL, run:
docker-compose -f docker-compose.dev.yml up --build
This will start the database and the application, exposing the REPL on port 7888. You can now connect to the REPL from your editor and continue with your development.
For production run:
docker-compose -f docker-compose.prod.yml up --build

And there you have it! You're now running a tight ship with separate dev and prod environments. Your local machine stays clean, your production environment stays lean, and you get to feel like a Docker deity. Not bad for a day's work, eh?
Where from here?
You've become the Docker whisperer for Clojure apps. Need to containerize a Clojure project? You got this. Want to ensure consistent environments across your team? Piece of cake. Looking to simplify your deployment process? It's in the bag. So, yeah, where from here?

Happy coding, and may your containers always be light and your REPLs always be responsive!

with Freshcode


.avif)


